Chapter 1-8: Application Design Tools |
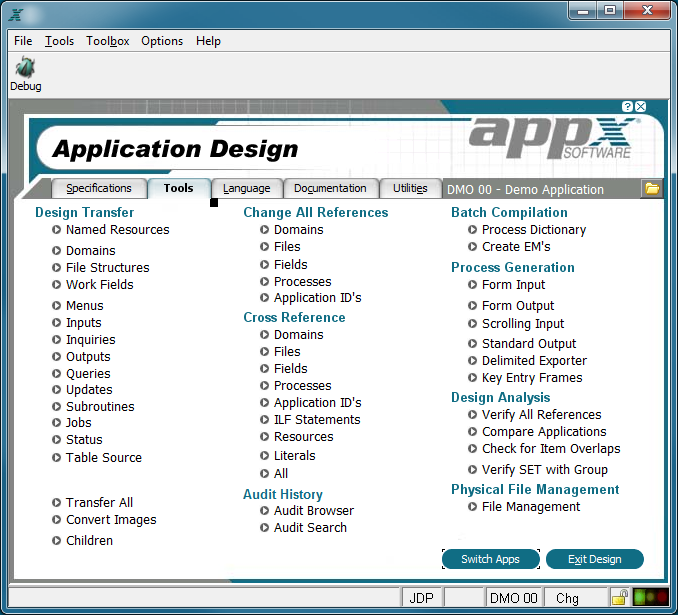
Design Transfer The Design Transfer utilities permit all or a portion of an application's design to be transferred to or from another application or within the same application. For example, if you want to create a new report that is similar to an existing one, you can transfer the output process and assign the copied process definition a new name. After the transfer, you can then modify the copied process definition. Select to transfer from the Tools tab on the Application Design menu menu shown below.
Design Transfer You can elect to transfer an entire application, or only parts of it, or you can transfer a process. When you select any option (other than transfer all) from the Design Transfer menu, a screen like the one shown below appears.
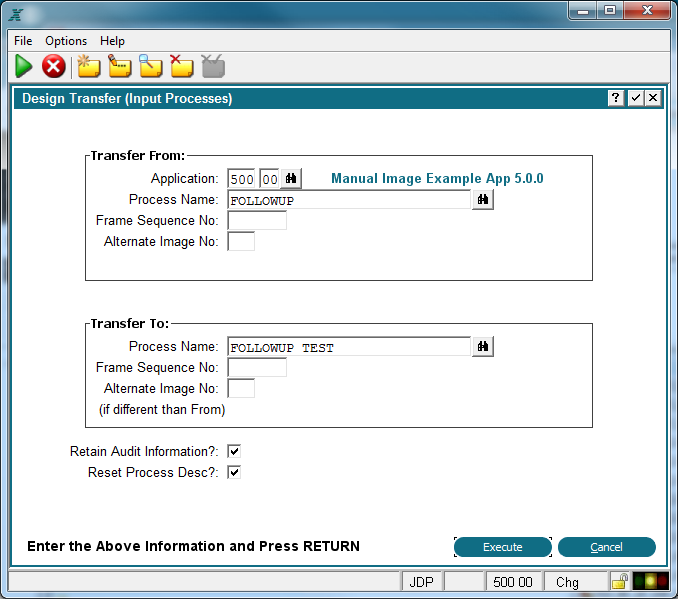
Design Transfer (Input Processes) Screen In this example, you would be transferring an input process. Notice that you have the option of transferring all or part of this process; if you enter only the process name, the entire process will be transferred. However, you can specify detail down to the image level. The same is true for design transfer for all types of processes. The amount of detail available for transfer depends on the type of transfer being made. NOTE: If you transfer a process from a version that is different from the one you are working on, and you do not transfer the process control file, APPX will issue an error when you attempt to edit the process. APPX does not 'look' across versions for a file. All transfer options produce a log of the activity. Any problems encountered during transfer are noted. Convert Images is used to transfer an existing image to an existing image. Use this utility to convert an Input image to an Output image (or vice versa) since there are design differences between the two types of processes. The transfer may occur from within the current application. Design Transfer Automatic Children from frame to frame, or Optional Children from Image to Image.
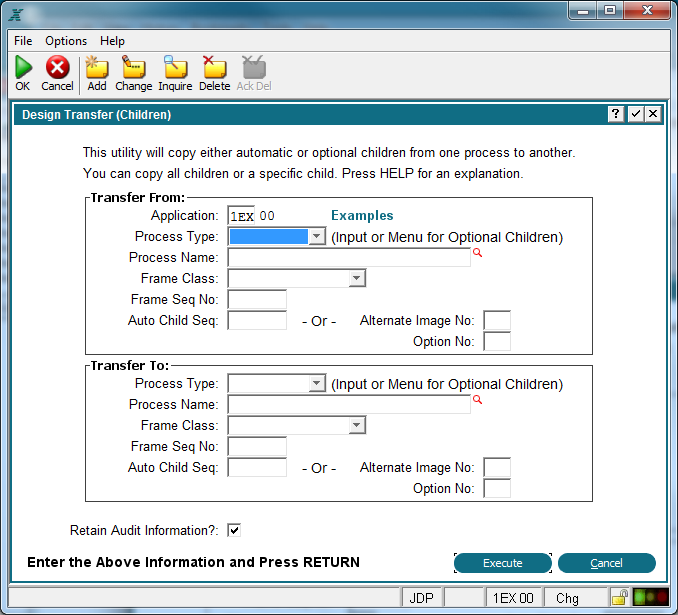
Design Transfer (Children) Screen You must first identify the Process Type, Process Name and Frame Seq No you wish to transfer from. You then have 4 possibilities for the remaining fields: Leave everything blank. This tells the utility that you want to transfer all Automatic Children from the specified Frame. Enter the 'Auto Child Seq' number. This tells the utility that you want to transfer that specific Automatic Child. Enter an 'Alternate Image No', but leave 'Option No' blank. This tells the utility that you want to transfer all Optional Children from the specified Image. Enter an 'Alternate Image No' and an 'Option No'. This tells the utility that you want to transfer that specific Optional Child. In the 'Transfer To' section, you identify the target of the design transfer. It can be the same or a different process. You must at least supply the Process Type, Name and Frame Seq No. If you are transferring all Automatic Children, they will be copied to the specified Frame (you must chose a different process or frame in this case). If you are transferring a specific Automatic Child, the 'Auto Child Seq' is optional. If not provided, it will use the same number as the source, otherwise it will be transferred to the specified seq no. If you are transferring all Optional Children, they will be copied to the specified Image (you must choose a different process or frame in this case). If you are transferring one Optional Child, the 'Option No' field is optional. If not provided, it will use the same number as the source, otherwise it will be transferred to the specified Option No. You cannot supply both an 'Alternate Image/Option No' and 'Auto Child Seq', you can only transfer either Optional Children or Automatic Children, not both at the same time. And you cannot mix Automatic and Optional children on a transfer. |
Application Design Manual "Powered by Appx Software"1296 ©2006 By APPX Software, Inc. All Rights Reserved |